 ALPHIXOR
User guide
Set up Binance futures automated trading: installation, API connection, strategy rules, backtesting and live trading.
Before you start: stopping does not close positions. ↗Getting started
Alphixor is Binance USDⓈ-M futures automated trading software for Windows. Build systematic trading strategies with technical indicators and entry, scale-in and exit rules, then backtest those rules before applying them to live trading.
Live trading requires a Binance account and an activated USDⓈ-M Futures account. If you do not have a Binance account, Sign up for Binance.
Account requirements for live trading
For Alphixor live trading, use a Binance account whose Futures account was opened on or after October 15, 2026. The relevant date is when the account placing orders opened its Futures account, not when it registered on Binance. If its Futures account predates this date, you can create a new sub-account under your existing master account, activate Futures for that sub-account, and connect using its own API key. If you registered on Binance earlier but have not opened a Futures account, proceed with Futures activation.
Once the account is ready, use Connection test in Alphixor to check whether it can be used. If the connection is rejected, follow the reason shown in the app and review API connection. Share only the error message when requesting help, never your API Key or Secret Key. These account requirements apply to live trading, not backtesting.
Follow Sub-account setup, Futures activation and API connection for the steps.
Binance registration screens
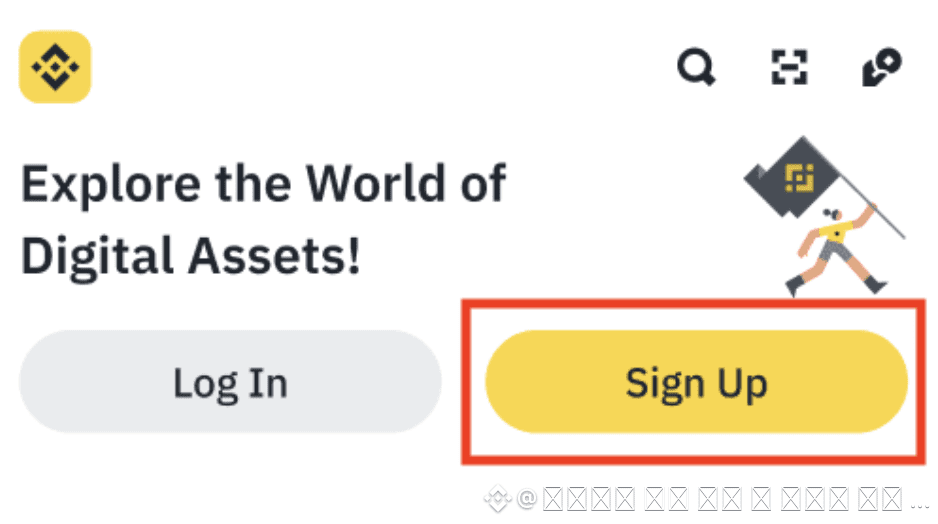
Open the registration link and create your account. Menus and verification methods can vary by account and region.
- Select Sign Up. If a login form appears, choose Create a Binance Account.
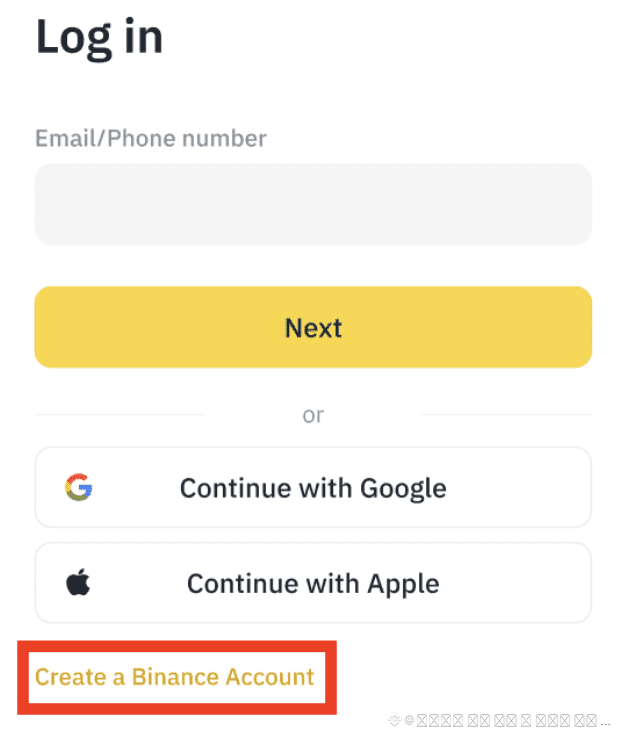
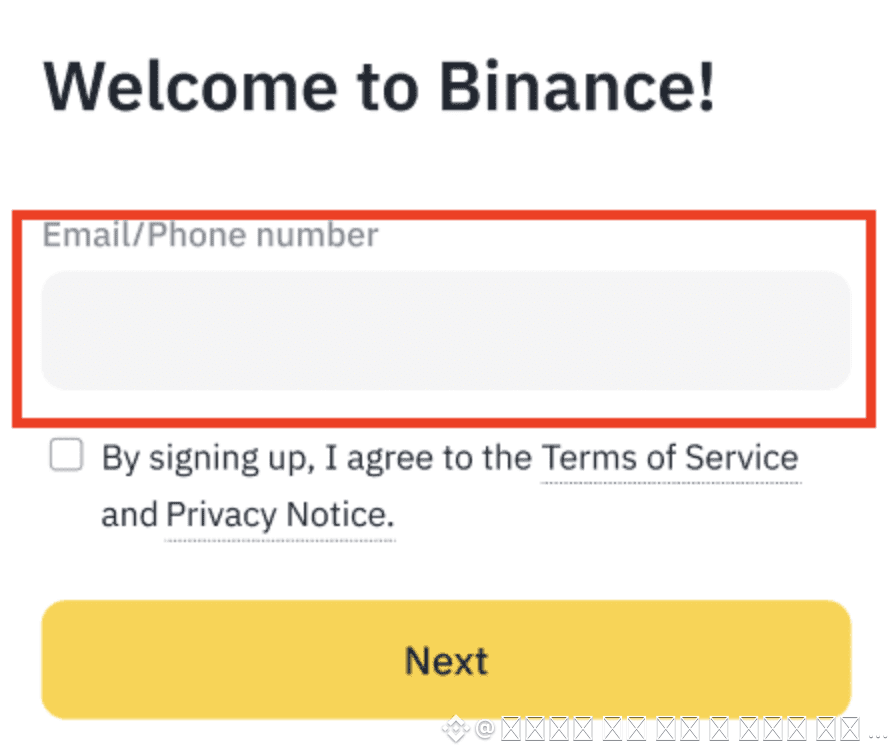
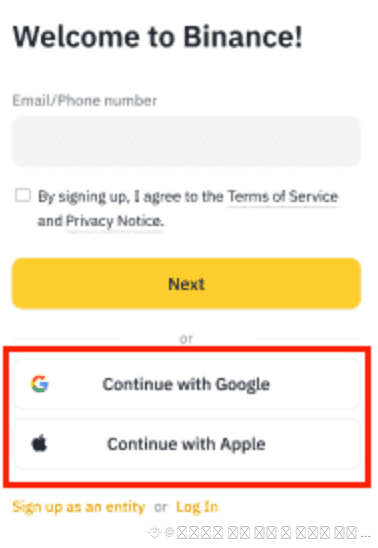
- Enter your email address or phone number, review the terms, and select Next.
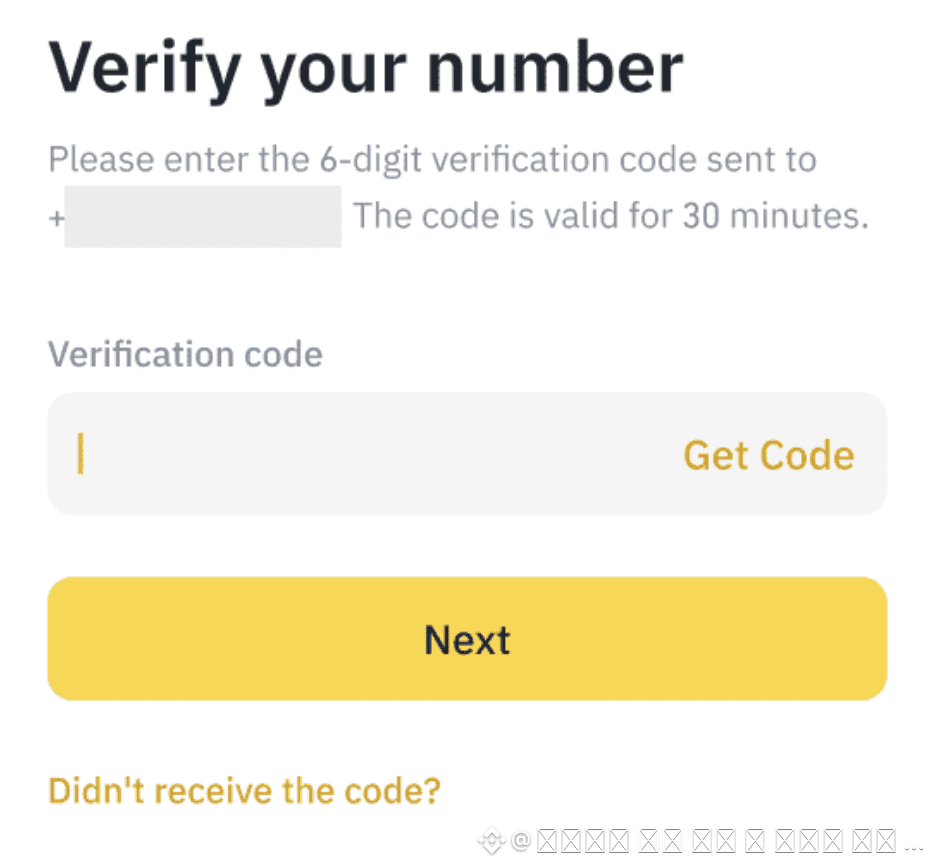
- Enter the verification code sent to you. Then set a password and complete the identity verification shown on screen.
To register with a Google or Apple account, choose its button on the registration screen and follow the authentication steps.
After registration, continue with futures activation and API key creation in API connection.
Official Binance guides
- Account registration
- Identity verification
- Creating and managing sub-accounts
- Opening a Futures account
- Creating API keys
Before you begin
- Keep your PC and the app running with an internet connection during automated trading.
- Stop is not Close position. Read Stopping and closing before going live.
- A backtest is a simulation, not a promise of returns. Fees, slippage, unfilled orders and connectivity can change live results.
Follow this order
- Prepare the app using Installation and profiles.
- Check the account connection and hedge mode in API connection. Do not start live trading when you only intend to backtest.
- Save symbols, directions and entry/exit rules in Trading settings.
- Run a backtest and inspect individual trades.
- Complete the checks in Live trading.
- Once running, compare app logs with orders and positions on Binance.
Find your way around
| Screen or button | Purpose |
|---|---|
| Live trading / 실거래 | Monitor the real account and run automated trading. |
| Backtest / 백테스트 | Test settings using historical data. |
| Analysis / 분석 | Review and compare backtest results. |
| Trading symbols / 매매 심볼 | Select symbols separately for LONG and SHORT. |
| Trading settings / 매매 설정 | Edit shared settings and entry, additional-entry and exit rules. |
| API settings / API 설정 | Enter credentials, test the connection and change to hedge mode. |
| Settings folder / 설정 폴더 | Find local configuration and records. |
Installation and profiles
Open the app
- Get the Windows x64 installer from the download page. A Windows 10/11 x64 PC is required. If Alphixor is running, stop trading and backtests, then close all its windows.
- Run
Alphixor-version-win-x64-Setup.exeand choose the installation folder and shortcuts. The default is%LOCALAPPDATA%\Programs\Alphixor, installed for the current Windows user. Open Alphixor from the Start menu after installation. - Choose a profile. If the app says it is already in use, check the existing window.
- Locate Live trading, Backtest and Analysis. Do not press Start in Live trading until setup is complete.
If Windows blocks the app, verify where the file came from and check the release instructions. Do not disable security protections wholesale.
The current installer is not Windows code-signed. Installing, updating or uninstalling does not delete existing profiles, API settings, candles or backtest results. To uninstall, select Alphixor in Windows Settings → Apps → Installed apps.
What do profiles separate?
Each profile has its own trading strategy, backtest settings and API connection. Register API keys separately when using a profile for the first time. After switching profiles, check the connected Binance account and trading settings.
Creating a profile does not create a Binance account or separate trading funds. Profiles connected to the same Binance account can affect the same orders and positions.
If the app will not open
Check that installation finished, that you opened Alphixor from the Start menu, and that the same profile is not already running. Record the error message, app version and time of failure if the problem persists. Do not share credential files or your API Secret.
Next: API connection
API connection
1. Check which account to use
Read the account requirements first. The relevant date is the trading account's Futures account opening date, not its Binance registration date. If it opened Futures before October 15, 2026, prepare a new sub-account as described below. If Futures has not yet been opened or was opened afterward, you can use that account directly: skip sub-account creation and check its Futures activation status first.
2. Create a new sub-account
- Sign in to the Binance website with your master account.
- Open Profile → Dashboard → Sub Accounts → Account Management → Create Sub Account.
- Choose a regular or virtual email. A regular email must be unused by another Binance account and needs email verification. A virtual-email sub-account is operated through the master account's API management rather than a separate login.
Complete master-account identity verification and two-factor authentication first. If the menu is unavailable or creation is rejected, check eligibility with Binance Support. Follow the current official sub-account guide.
3. Activate USDⓈ-M Futures
In sub-account management, find Futures activation for the intended sub-account, enable USDⓈ-M Futures and complete the displayed agreements and checks. Check the sub-account separately even if the master account already has Futures enabled. Transfer trading funds to that sub-account's USDⓈ-M Futures wallet through the master account's asset management.
Activate Futures before creating the API key. See the Futures account opening guide for a regular account and Binance's official sub-account Futures announcement. Menu labels and availability may vary by account, region and interface version.
4. Create the intended account's API key
- For a sub-account, select it in the master account's Sub Accounts → API Management. For a regular account, open its own API Management.
- Choose Create API → System generated (HMAC), enter a label and complete security verification. Keep the
API KeyandSecret Keyready. - Check reading and Enable Futures permissions. Do not enable withdrawals.
- Allowlist the public internet IPv4 of the PC running Alphixor, not the website server's IP or a private LAN address. Update the allowlist if that public IP changes.
- To trade the sub-account, enter its own key, not the master account's. Never send keys or secrets through chat, email or the website.
HMAC keys without IP restrictions may be restricted to reading. If Futures permission is unavailable, check Futures activation and the order in which you created the key. A key created before activation may need to be recreated afterward; Portfolio Margin can also prevent enabling this permission. Follow the official API key guide for current steps and restrictions.
API key creation screens
These screenshots show API management for a regular account. For sub-account trading, first select the intended sub-account under Sub Accounts → API Management.
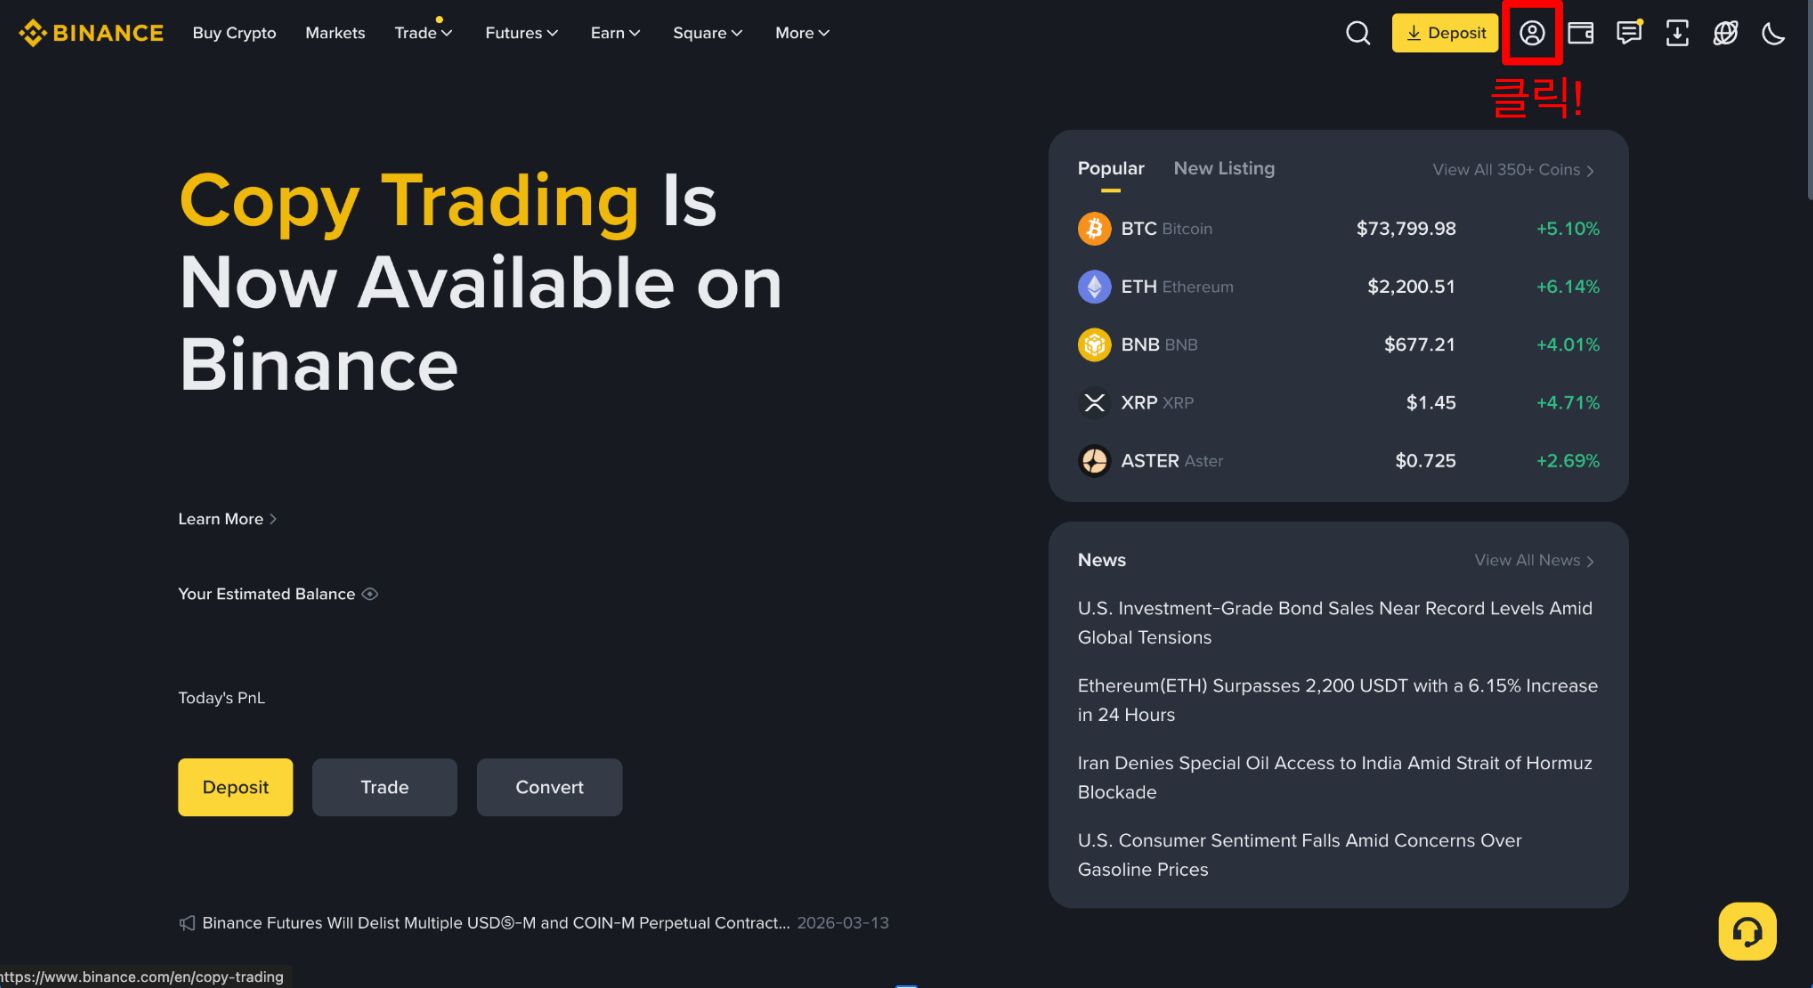
- Open the profile icon on the Binance website, then go to Account → API Management.
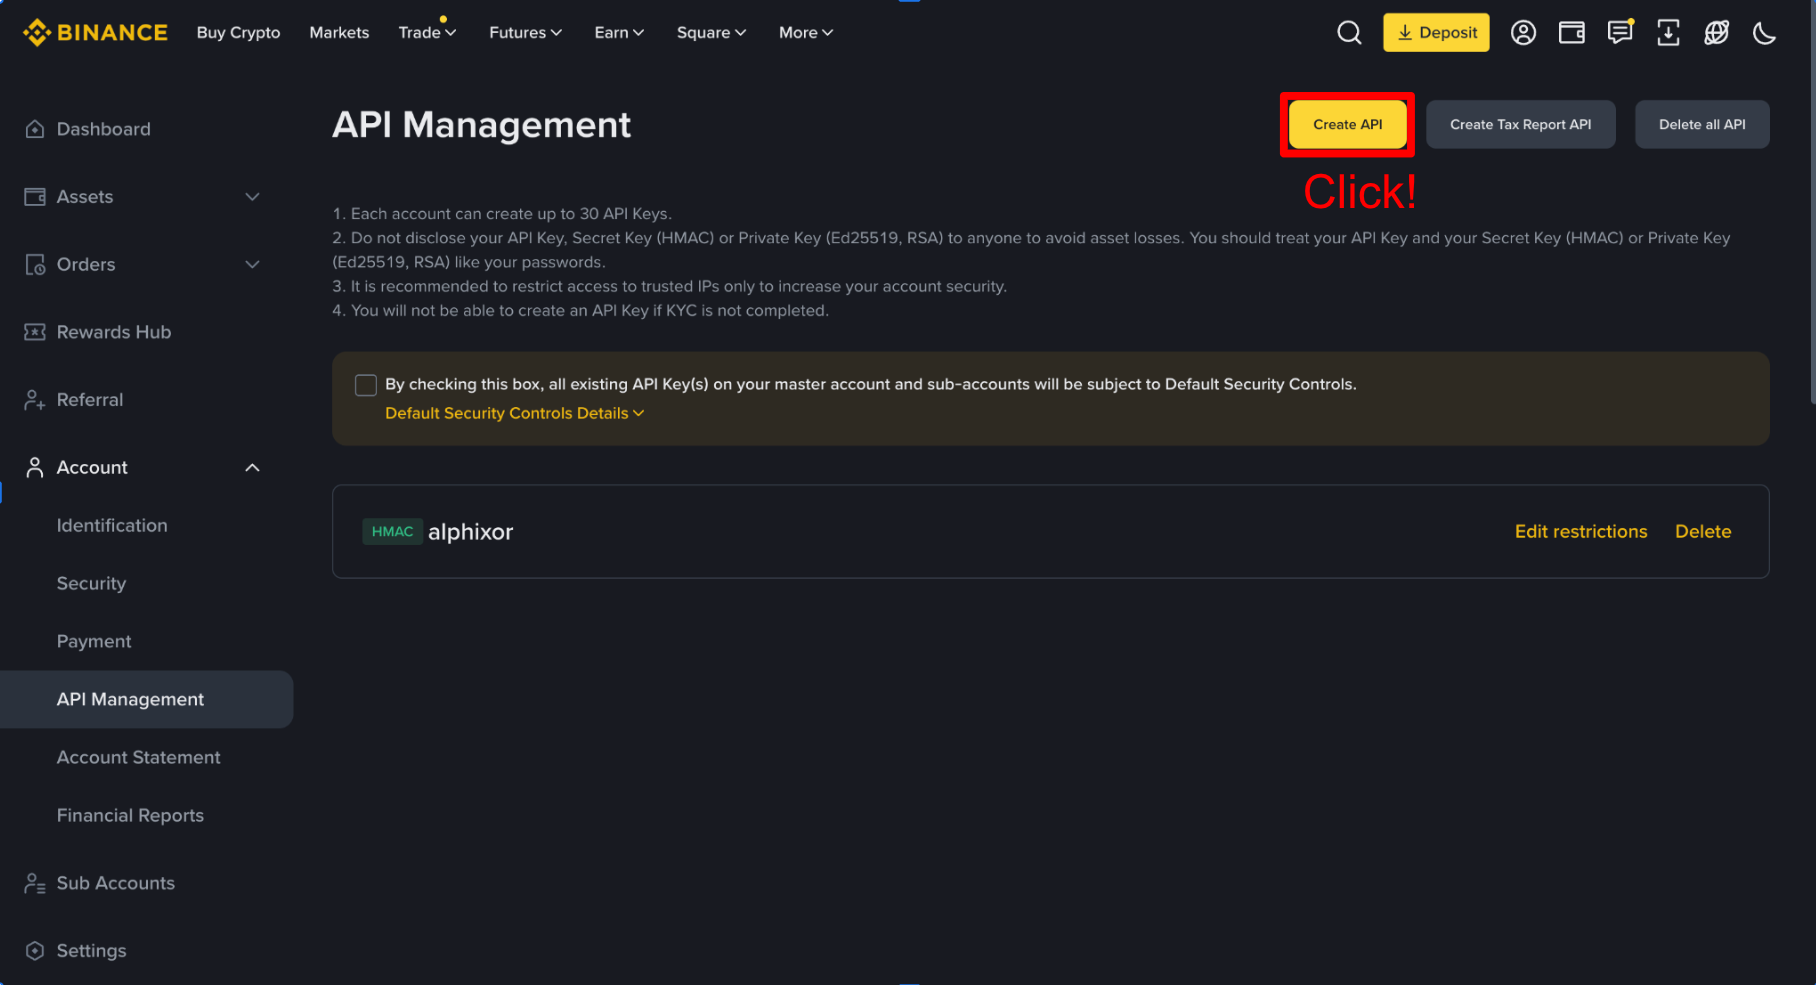
- Select Create API.
- Choose System generated. This creates the HMAC key used by Alphixor.
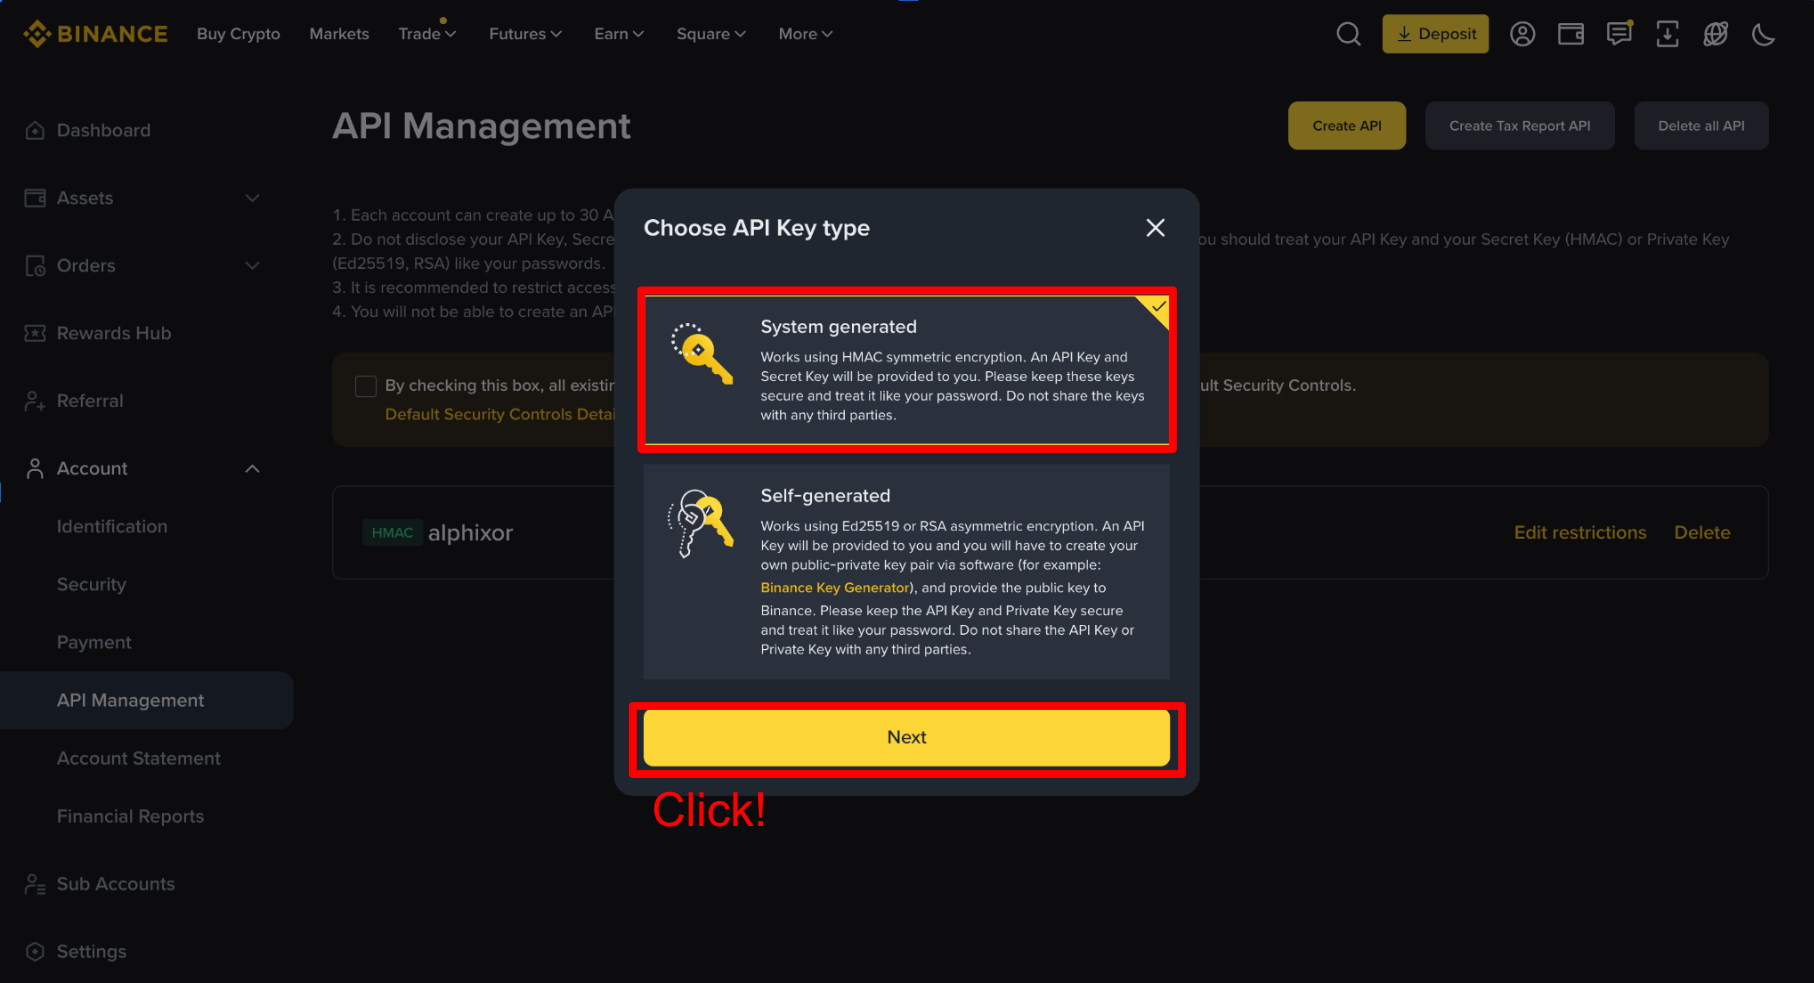
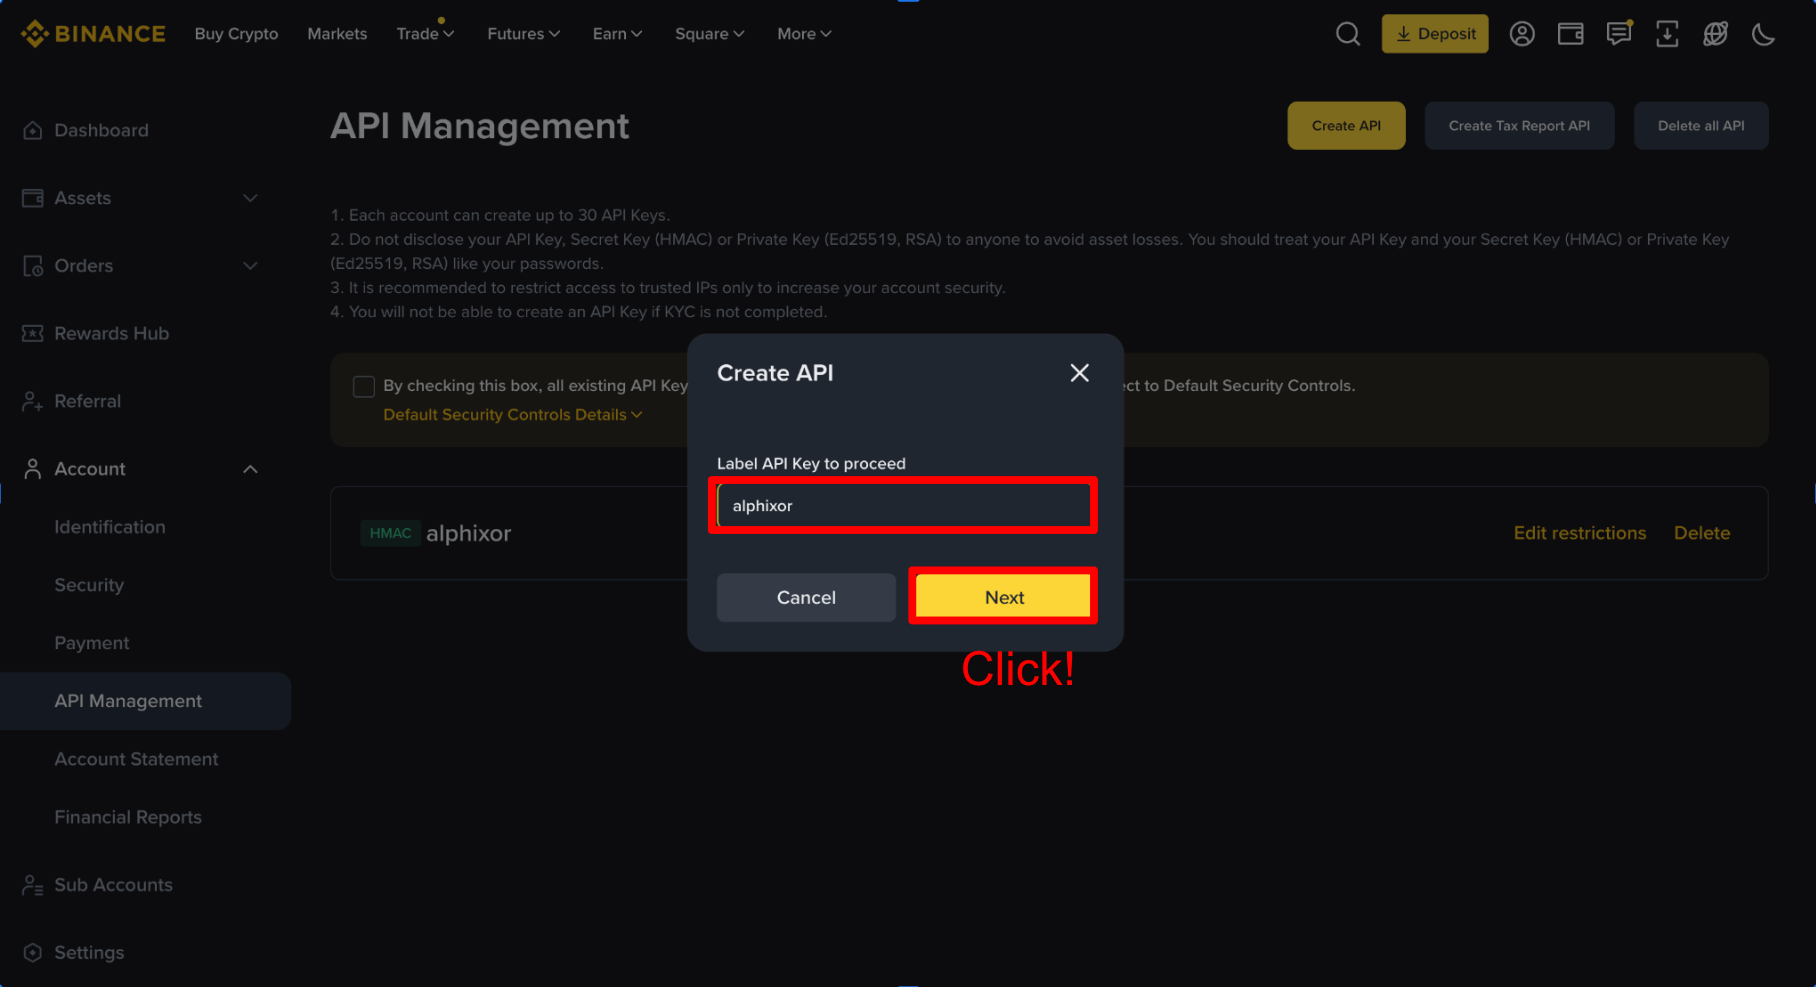
- Enter a label that identifies the key's purpose, such as
Alphixor, then select Next.
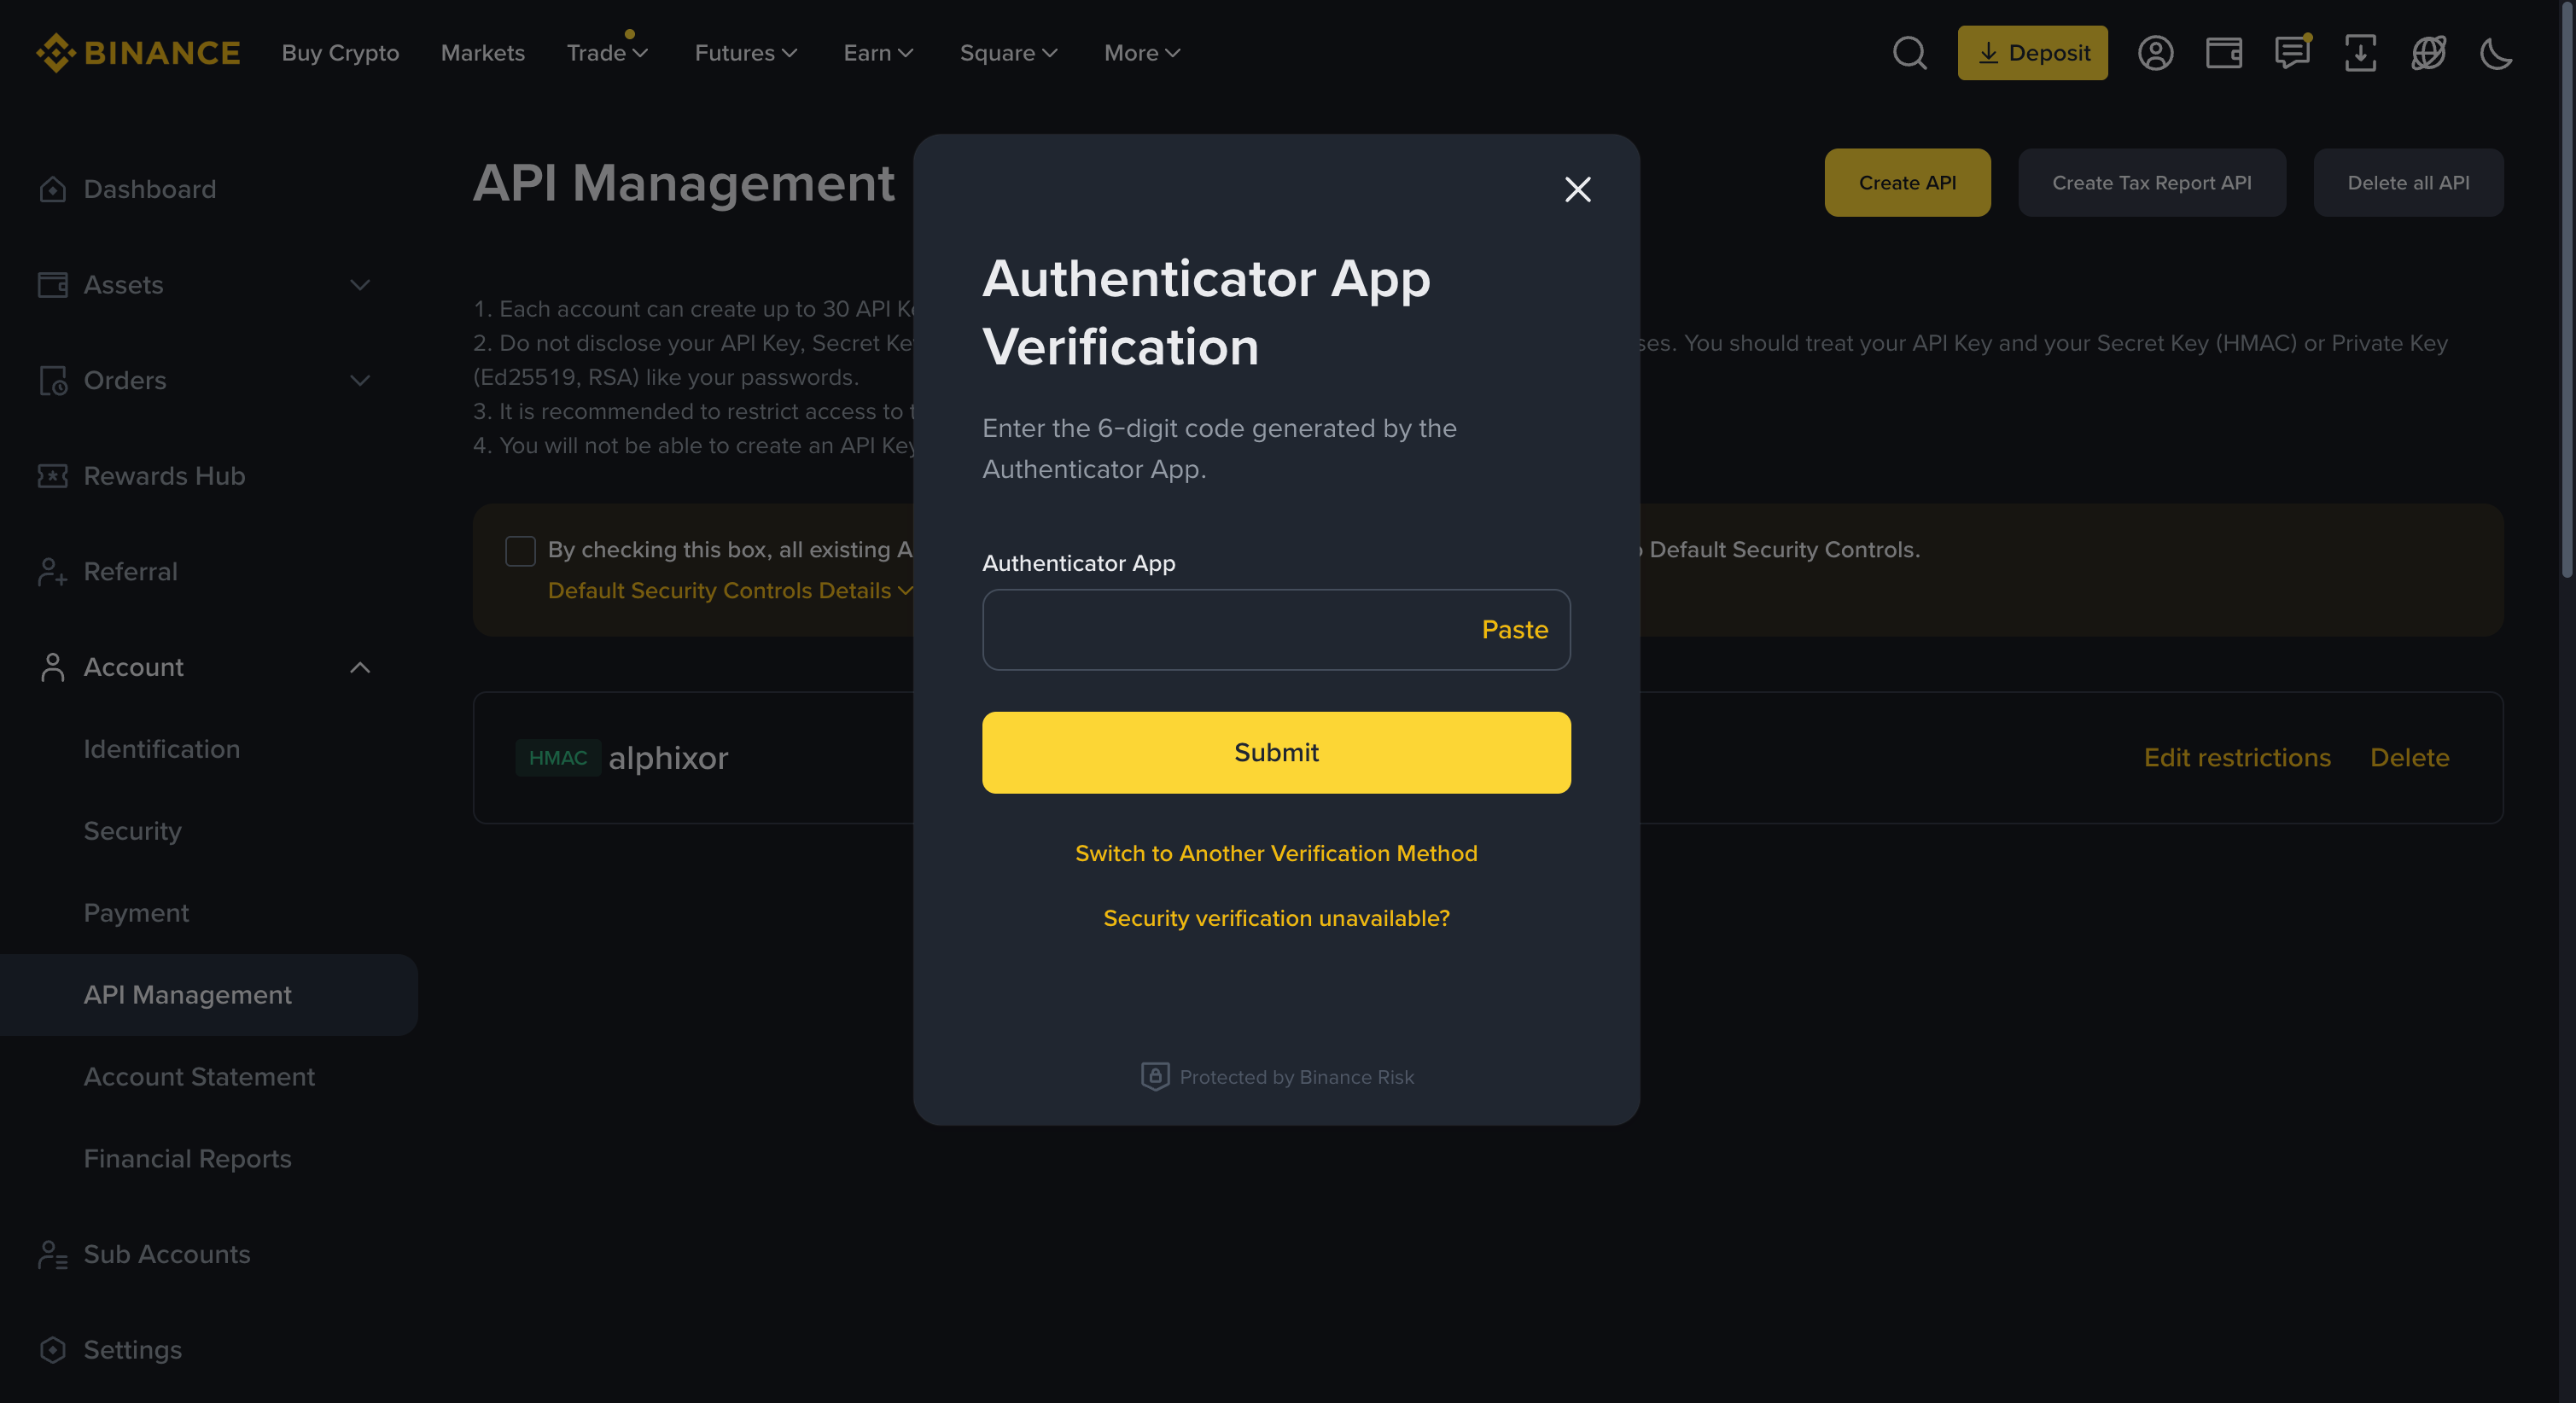
- Complete the security verification configured for your account. If you use an authenticator app, enter the code displayed in that app.
Apply the futures trading permissions and IP restrictions described above, then save the key. Enter the API Key and Secret Key in Alphixor using the Connect in Alphixor steps below.
Connect in Alphixor
- Open Live trading → API settings / API 설정.
- Enter the API Key and Secret Key in their respective fields. Check for missing characters or surrounding spaces.
- Click Connection test / 연결 테스트. This reads account information and position mode; it does not submit a trading order.
- Confirm the success message, wallet information and whether hedge mode is enabled. “Key saved” alone does not confirm a working connection.
- Choose whether to save encrypted for the current Windows account, then click Save / 저장.
The app automatically checks whether the account can be used during connection testing and before live trading starts. If the connection is rejected, check Futures activation, API permissions and your PC’s public IP allowlist, then follow the app’s instructions. Contact the operator with the error message if the issue persists.
Encrypted storage keeps API keys on your PC, protected for your Windows user account. If you save with this option unchecked, previously stored keys are removed and the entered keys are used only for the current session. You will need to enter them again next time. Set up the API connection again on a different PC or Windows account.
If API registration or connection testing fails
- Futures activation: Confirm that USDⓈ-M Futures activation is complete for the account or sub-account you will actually trade. Enabling Futures on the master account does not automatically activate it for a sub-account. Activate Futures before creating the API key. If an existing key cannot be given Futures permission, create a new key after activation.
- Public IP and API key pair: Allowlist the public IPv4 of the PC running Alphixor, not a private LAN address or the website server's IP. Update the allowlist if a VPN or network change changes that public IP. Enter the matching API Key and Secret Key for the intended account or sub-account, without missing characters or surrounding spaces.
- API Futures permission: In API Management, check reading and Enable Futures permissions, then save. Activating the Futures account and granting permission to an API key are separate steps. Enable the permission if it is off. If the option is disabled, check the activation and key-creation order in item 1.
- Futures account opening date: Check whether the trading account opened Futures after October 15, 2026. This is not the Binance registration date or the API key creation date. For an account that opened Futures earlier, create a new sub-account, activate its Futures account and connect using that sub-account's API key.
- Referral registration: Check whether you used someone else's referral code or referral link when registering the account. Such accounts may be restricted from using Alphixor. If you are unsure, ask Binance Support to confirm. Recreating an API key does not change the account's referral registration.
After fixing the relevant items, test the connection again. If it still fails, send the app version and exact error to the operator without sharing API keys or secrets.
Hedge mode and margin mode
Live startup checks hedge mode. Switch to hedge mode / 헤지모드로 전환 asks for confirmation and changes position mode for the entire futures account. Existing positions or open orders may prevent the change. Review the impact on existing trading before proceeding; do not close positions solely to dismiss a setup error without considering the consequences.
The app does not change isolated/cross margin mode. Check each symbol's existing setting on Binance. Hedge mode, margin mode and leverage are separate settings.
Next: Trading settings
Trading settings
Select symbols and directions
Open Trading symbols / 매매 심볼 and select markets separately in the LONG and SHORT tabs. Enabling one direction does not enable the other. Start with a scope you can inspect so you know which rules apply to each market and direction. A selected symbol still needs enabled rules whose conditions can pass.
Read shared settings
| Setting | Meaning |
|---|---|
| Leverage | Applies to LONG and SHORT on selected symbols and is applied to the exchange at live startup. Check the exchange setting too. |
| Real-time trading | Evaluates conditions about every three seconds when enabled, or at the start of each minute when disabled. This is not a guaranteed fill time. |
| Buy limit lifetime | How long unfilled entry-limit quantity remains before cancellation. |
| Sell limit lifetime | How long unfilled exit-limit quantity remains before cancellation. |
| Reference wallet amount | A basis for sizing entries. Zero disables this amount cap. |
| Reference wallet percentage | When both amount and percentage are set, the smaller basis is used. The reference balance does not decrease during operation under its update rules; it is not the same as current available balance. |
| Top-volume filter | Ranks 24-hour volume within your selected symbols, not indiscriminately across every market. |
Leverage affects order notional. If calculated margin is 10 USDT and leverage is 3×, notional is 30 USDT. These numbers explain units; they are not recommended trading settings.
Build rules in this order
- Confirm the target symbol and LONG/SHORT direction.
- Inspect the entry condition, order type and size.
- Inspect exit conditions and the quantity to close. An app-evaluated exit is not necessarily a protective order permanently resting on the exchange.
- Enable additional entries only when needed, checking each rule's maximum fill count and additional size.
- Review indicator interval, period, weight and offset, plus AND/OR group connections. Distinguish a value comparison from a crossover condition.
- Save settings and inspect actual simulated trades in a backtest.
When conditions are met at the same time, they are processed in this order: exit → additional entry → new entry.
ATR sizing and entry tags
With ATR sizing enabled, the Inverse / 역비례 checkbox changes the calculation. Proportional sizing uses units × ATRP × weight; inverse sizing uses units ÷ ATRP × weight. The resulting percentage is capped between 0 and 100. An ATRP of 2% uses the numeric value 2, not 0.02. Both modes still apply leverage. Use the ? help next to the setting to inspect the selected formula and example.
An entry rule's Tag identifies the position cycle started by that entry. An empty Entry Tag / 진입 Tag filter on an additional-entry or exit rule matches all tags; comma-separated values match multiple tags. Matching is case-sensitive. Tags do not create independently owned positions for the same symbol and direction.
Save and load settings
Use Save to file / 파일로 저장 to keep an .alphixor strategy file. After Load from file / 파일 불러오기, inspect selected symbols and rules, then click Save settings / 설정 저장 to apply them. Importing someone else's configuration and starting actual trading are separate actions.
Next: Backtesting and analysis
Backtesting and analysis
Run your first backtest
- Save symbols and strategy settings, then open Backtest / 백테스트.
- Open Backtest settings / 백테스트 설정 and review the fields below.
- Begin with a short period to confirm data collection and execution. The first run over uncached dates may take longer.
- Click Start and watch progress and logs.
- When finished, inspect daily results and individual trades for the expected direction, size, entry and exit behavior.
| Field | Meaning |
|---|---|
| Starting balance | Simulated initial USDT wallet balance; it does not deposit money into your account. |
| Start date | Beginning of the collection/test period. |
| End date | Candles before this date are used. Do not assume the entire end date is included. |
| Slippage (%) | An adverse adjustment to simulated market execution prices. |
| Chart subdivisions | Number of evaluations along a candle's OHLC path, from 1 to 600. This does not replay actual exchange ticks. |
| Real-time trading | Disabled: evaluate the first subdivision of each minute. Enabled: evaluate every subdivision. |
| Exchange fee (%) | Applied to both entry and exit fill notional. |
The Real-time trading checkbox on this screen controls simulation evaluation. It does not enable actual orders.
Read results in order
Start with trade count and individual trades. If there are no trades, inspect symbol and direction selection, enabled rules and the data period before interpreting returns. Then review profit/loss, fees, unrealized results and capital usage together. A high return alone can conceal substantial interim losses or capital requirements.
Realized P&L comes from closed trades; unrealized P&L values positions still open. Check whether positions remain at the end of the test. Results using different balances, costs or periods are not directly comparable.
Use Analysis
You can open Analysis / 분석 while a backtest runs. Switching tabs does not stop it. Completed results are added to the list without replacing the current analysis view. For comparisons, check the period, symbols, subdivisions and cost assumptions as well as the strategy.
Stop requests backtest cancellation. Closing the app can interrupt preparation, paused work or saving, and unsaved results may be lost. Save the results you need before closing.
Starting and monitoring live trading
Check before starting
- Confirm you are on Live trading, using the intended profile and Binance account.
- Verify the API connection test and hedge mode.
- Check existing positions, open orders and isolated/cross settings on Binance.
- Review selected symbols and LONG/SHORT directions, leverage, entry sizing, additional-entry limits and exits.
- Distinguish coin quantity, margin and order notional. Check exchange minimum-order requirements.
- Disable Windows automatic updates and check for any pending restart.
- Keep the PC running and check its sleep settings. Make sure you can access Binance directly if connectivity fails.
Examples are not recommended strategies or promises of returns. If a rule or size is unclear, inspect the settings and backtest before starting.
Permanently disable Windows automatic updates
Disable Windows automatic updates before starting live trading. An update restart closes the app and stops strategy evaluation and position monitoring. Orders and positions may remain on Binance.
This policy has no expiry date and remains until changed. Use an administrator account on Windows 10 or 11 Pro / Enterprise / Education.
Setup
- Check your edition under Settings → System → About → Windows specifications.
- Press
Win + R, entergpedit.msc, and open Local Group Policy Editor. - Go to Computer Configuration → Administrative Templates → Windows Components → Windows Update → Manage end user experience. On older versions, look directly under Windows Update.
- Open Configure Automatic Updates.
- Select Disabled → Apply → OK.
- Close the app and restart during maintenance. Reopen the editor and confirm Disabled before starting live trading.
Policy reference: Microsoft automatic update configuration.
Home edition
Home does not include Local Group Policy Editor. This procedure does not apply to Home; stopping the Windows Update service alone cannot guarantee a permanent block. The policy instructions here target Pro / Enterprise / Education.
Check after setup
- If a restart is already required or scheduled, follow Stopping and closing, check exchange exposure, and finish pending updates and the restart before trading. Do not assume changing the policy cancels an existing restart.
- On organization-managed PCs, central policies can override local settings. Recheck after Windows upgrades or policy changes.
- Security updates will also require manual installation. Use planned Windows update maintenance.
To restore automatic updates, change the same policy to Not Configured.
Start
- Click Start / 시작.
- Read the confirmation: actual futures orders will be enabled and configured leverage applied.
- Approve only if this is the intended run.
- Check logs for engine startup and errors. If startup fails, investigate before repeatedly trying again.
- Compare the first order with Binance orders, fills and positions. No immediate order can be normal while conditions are unmet; use logs to distinguish waiting from failure.
What to monitor
| Display | What to check |
|---|---|
| Wallet / available balance | Distinguish total wallet funds from funds available for orders. |
| Unrealized P&L / return | Changes in the valuation of open positions. |
| Open positions | Which symbols and directions are open. |
| Market status | Per-market status and trading restrictions. |
| Market trade history | Actual fill prices, quantities, realized P&L and fees. |
| Logs | Connection failures, rejected orders and incomplete order cleanup. |
Manual orders
Manual order / 수동 주문 submits a real account order. Review the symbol, position side, action, order type, quantity and price, then read the confirmation. Manual trading changes the same account positions that automation uses; it does not run in a separate virtual account.
If an order response is delayed or ambiguous, do not immediately submit it again. First check open orders and fills on Binance.
Next: Stopping and closing
Stopping and closing
Stop and app exit do not automatically close existing positions. Closing a position requires a separate action and confirmation that it filled.
What Stop does
The app stops automated trading and cleans up the reservations it is tracking. Reservations not yet submitted are removed. For submitted orders, it attempts to check status and cancel remaining unfilled quantity. This is not a cancel-all-orders function for the entire account.
Normal shutdown allows up to 30 seconds for order cleanup. Connectivity errors or timeouts can leave orders on the exchange, with failures reported in logs. Open orders or positions can remain on Binance even after the app has stopped.
Finish a session
- Click Stop / 중지 and wait for shutdown processing to finish.
- Check logs for failed cleanup or remaining exchange orders.
- Inspect open orders and LONG/SHORT positions directly on Binance.
- Decide whether to keep or close positions. If closing, perform the separate action and confirm actual fills.
- Save settings and results you need, then exit the app.
Closing, force quit and sleep
Closing while active shows a confirmation. Approving stops automation and position monitoring, then performs cleanup before exiting. Unsaved backtest results can be lost.
Force quit, power loss and network failure do not guarantee normal cleanup. Check Binance first. While the PC is asleep or the app is off, app-based exit conditions are not continuously evaluated.
Before restarting automation, review existing exchange orders and positions against the settings you plan to use.
Next: Backups and updates
Backups and updates
Back up settings and records
To keep or share a strategy, use Trading settings → Save to file to export an .alphixor file. Export each profile separately if you use more than one. Keep any backtest reports you need as well.
For additional data backups, open Settings folder / 설정 폴더 in the app to find the location. Close the app normally before copying or restoring files. Do not share the entire settings folder: it can contain API settings and account or trading records.
Update the app
Read the release instructions before installing a new version, then follow these steps.
- Read the release version and changes.
- Stop automation and check orders and positions as described in Stopping and closing.
- Back up settings and results you need.
- Close all Alphixor windows, then run the new installer from the download page. The existing installation path and user data are preserved. Installation is blocked while the app is running.
- Open Alphixor from the Start menu and check the profile, API connection and trading settings.
- Resolve compatibility messages or errors, run appropriate backtests, and decide whether to resume live trading.
Replacing or revoking an API key does not remove existing positions. Manage exchange exposure separately.
Windows update maintenance
After disabling Windows automatic updates, install security updates manually during planned maintenance.
- Stop automation and check orders and positions on Binance.
- Exit the app, select Windows Update → Check for updates in Settings, install the required updates and restart.
- Confirm Configure Automatic Updates → Disabled in Local Group Policy Editor. Check the API connection and trading settings before resuming live trading.
Next: Troubleshooting
Troubleshooting
The connection test fails
Start with the five API connection checks. Check that the API Key and Secret belong to the same pair, futures permissions and IP restrictions are correct, and the PC clock and internet connection are working. Record the error and investigate one cause at a time. Repeatedly generating keys or restarting the app is not a diagnosis.
Hedge-mode switching fails
Check positions and open orders in the futures account. The change affects the whole account. Read the confirmation and error messages, and consider other trading before proceeding.
The engine starts but places no orders
Check LONG/SHORT selection, enabled rules and whether conditions are met. Also inspect the top-volume filter, available balance, data preparation and market restrictions in logs. Do not increase size simply because a strategy is waiting for a condition.
An order is rejected or its status is unclear
Review quantity units, minimum-order requirements, available balance, leverage and API permissions alongside the error. If trading for a symbol is paused, check the reason and instructions in the log. Resolve the order rejection before resuming. For an ambiguous response, inspect Binance orders and fills before taking further action.
A backtest is slow or has no trades
Check whether data must be collected for the first time and try a shorter period to verify the workflow. More subdivisions, symbols and dates increase work. With no trades, inspect conditions, direction, dates and logs. If only the screen changed, check whether the backtest is still running behind the Analysis tab.
App and exchange displays differ
Compare observation times, open orders, partial fills, unrealized P&L, fees and trades made by other apps. The app display alone is not conclusive evidence of every order's final state. If a difference remains after stopping, inspect open orders and positions on Binance first.
What to include in a support report
Record the app version, profile, time, Live/Backtest mode, last action and exact error. Redact API credentials, account identifiers, balances and private trading data from screenshots and logs. Do not attach API credential files.
Quick glossary
| Term | Meaning |
|---|---|
| LONG / SHORT | Position directions; not interchangeable with an order's buy/sell action. |
| Entry / additional entry / exit | Start a position / increase its size / reduce or close it. |
| Limit / market order | Submit with a specified price condition / request execution at market. |
| Notional / margin | Price × position quantity / collateral used for the position. |
| Hedge mode / isolated or cross | Position-direction handling / margin handling. |
| Realized / unrealized P&L | Closed-trade results / valuation of open positions. |
| Backtest / live trading | Historical simulation / actual account orders. |